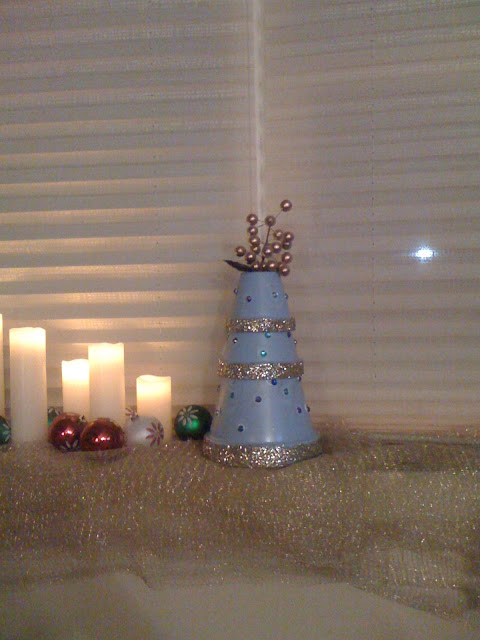
Well I told you that I had a few projects waiting in the wings, and here is one of them. I tried to follow this tutorial over at House of Hepworths. This came out looking more Dr. Seuss than Christmas but OH WELL!! The tutorial also calls for 4 pots and a saucer for this tree, but I have three rambunctious animals and I figured it would be sturdier if I just had the three pots stacked on top of each other.
Here is the finished product (I apologize for all the junk in the photo - I had just gotten home from work and really just didn't care to clean up)

I decided to do our colors Blue and Gold this year, to match our new living room colors.
First I went to Michaels and bought 3 Terra cotta pots...one 6 inch, one 4 inch and one 3 inch (the two inch does not fit over the 3 inch - even though it would make more sense to have 6,4,2...silly Michaels :-)). Then I used spray paint and my handy dandy Spray paint can adapter (this is the one I have). It really makes spray painting easy.
I have a tiny house and no garage or basement that I can access easily, so the only place that I could spray paint these were on our 3 season porch...Of course being impatient I did not prime before hand and in hindsight I really should have. Being in New England it is very cold outside right now and the paint didn't really dry so well. Even after 3 coats of paint.

I also found that there was a crack in the largest pot that I could not see until it was painted

Oh well - nothing I can do about it now.
These are the tools I used for this project:

Gold Glitter
Gold and Light Blue craft paint
Blue sequins (2 different sizes)
Foam paint brush
Thin artist paint brush
Tacky glue
Gold flower pick
Krylon short cuts clear gloss
(Step 1)
Spread tacky glue on the edges of the pots with the foam brush, and cover with the gold glitter.
(don't you just love my Hubs Keystone Light hat right there - Keith Stone!!)
(Step 2)
Then I took the Light Blue and Gold craft paints and painted (as best I could - I have NO talent whatsoever in the painting department) on swirls in both the gold and the blue.
(I even managed to cover the large crack with a swirl of paint...TRICKY, TRICKY, TRICKY)
*****SIDE NOTE*****I should know better than to try and do too many things at once...in the midst of making this tree I tried to bake some sugar cookies and did not hear the oven timer go off...little browner than they should be. Looks like the reindeer went on a tropical vacation and forgot the SPF!
*****END SIDE NOTE :-)*****
(STEP 3)
Next I took a little bit of the tacky glue and placed the sequins around the pots...I have noticed that I have a problem with random placements. I always seem to want to place things symmetrical and it always seems to look TOO put together. I guess I will have to work on that.
(you can see where I was putting too much glue on the sequins and they started to slide - so I had to keep adjusting them)
(Step 4)To keep the glitter in place and to stop it from getting everywhere once they were moved I sprayed on the Krylon Clear Gloss.
(Step 5)
I stacked the pots one on top of another and then I placed the gold berry floral pick through the hole in the middle of the top pot, and spread the berries to give it more of a whimsical Dr. Seuss look.
I placed it on the ledge of our bow window next to my simple LED candles and ornaments.
These are the parties I have linked up to this week. Please take a moment to stop by and see all of the beautiful things!


Hey Debra! That is SOOOOOOOO creative! LOVE IT! The finished creation is BEAUTIFUL!!! I MIGHT can do this !! Thank you for linking up! I look forward to visiting your post LOTS!
ReplyDeletexoxokara
I think that is so cute....and the cookies are so sweet!
ReplyDeleteoh this is a darling craft! my little girls are sitting here with me oohing and ahhhing at it...anything with sparkles - we just love! thanks for visiting my blog! i would love it if you followed me - I will click to follow you now. xo
ReplyDeleteI think that it turned out great! What a fun project! :) Thanks for the idea. I don't think that I would have ever thought of that.
ReplyDelete~Liz
I like it!! it's so cute and creative, very smart of you;) Thanks for sharing and have a wonderful Christmas!
ReplyDeletexoxo,
Ellen
Darling- came out so cute~ what a creative idea! Thanks for sharing at Feathered Nest Friday- Happy Holidays!
ReplyDeleteSo cute!!!!!!!!!!!!!! I love it!!!
ReplyDelete~Allison @ House of Hepworths