Pages

Tuesday, December 14, 2010

We Wish You A Seussical Christmas

Hello All~
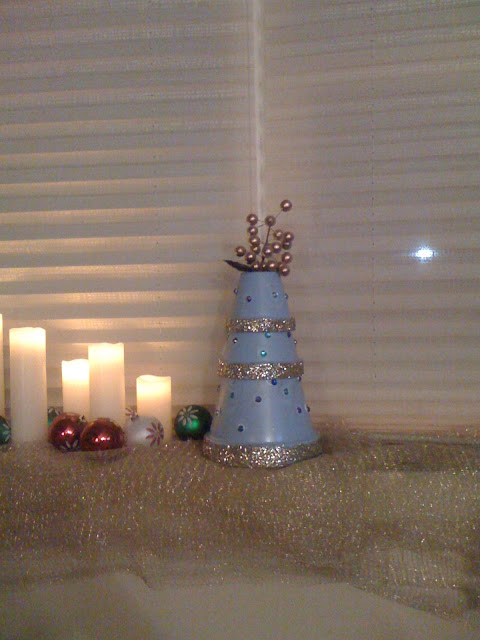
Well I told you that I had a few projects waiting in the wings, and here is one of them. I tried to follow this tutorial over at House of Hepworths. This came out looking more Dr. Seuss than Christmas but OH WELL!! The tutorial also calls for 4 pots and a saucer for this tree, but I have three rambunctious animals and I figured it would be sturdier if I just had the three pots stacked on top of each other.
Here is the finished product (I apologize for all the junk in the photo - I had just gotten home from work and really just didn't care to clean up)

I decided to do our colors Blue and Gold this year, to match our new living room colors.
First I went to Michaels and bought 3 Terra cotta pots...one 6 inch, one 4 inch and one 3 inch (the two inch does not fit over the 3 inch - even though it would make more sense to have 6,4,2...silly Michaels :-)). Then I used spray paint and my handy dandy Spray paint can adapter (this is the one I have). It really makes spray painting easy.
I have a tiny house and no garage or basement that I can access easily, so the only place that I could spray paint these were on our 3 season porch...Of course being impatient I did not prime before hand and in hindsight I really should have. Being in New England it is very cold outside right now and the paint didn't really dry so well. Even after 3 coats of paint.

I also found that there was a crack in the largest pot that I could not see until it was painted


Oh well - nothing I can do about it now.
These are the tools I used for this project:

Gold Glitter
Gold and Light Blue craft paint
Blue sequins (2 different sizes)
Foam paint brush
Thin artist paint brush

Tacky glue
Gold flower pick
Krylon short cuts clear gloss


(Step 1)
Spread tacky glue on the edges of the pots with the foam brush, and cover with the gold glitter.
(don't you just love my Hubs Keystone Light hat right there - Keith Stone!!)
(Step 2)
Then I took the Light Blue and Gold craft paints and painted (as best I could - I have NO talent whatsoever in the painting department) on swirls in both the gold and the blue.

(I even managed to cover the large crack with a swirl of paint...TRICKY, TRICKY, TRICKY)
*****SIDE NOTE*****
I should know better than to try and do too many things at once...in the midst of making this tree I tried to bake some sugar cookies and did not hear the oven timer go off...little browner than they should be. Looks like the reindeer went on a tropical vacation and forgot the SPF!
*****END SIDE NOTE :-)*****
(STEP 3)
Next I took a little bit of the tacky glue and placed the sequins around the pots...I have noticed that I have a problem with random placements. I always seem to want to place things symmetrical and it always seems to look TOO put together. I guess I will have to work on that.

(you can see where I was putting too much glue on the sequins and they started to slide - so I had to keep adjusting them)
(Step 4)
To keep the glitter in place and to stop it from getting everywhere once they were moved I sprayed on the Krylon Clear Gloss.

(Step 5)
I stacked the pots one on top of another and then I placed the gold berry floral pick through the hole in the middle of the top pot, and spread the berries to give it more of a whimsical Dr. Seuss look.
I placed it on the ledge of our bow window next to my simple LED candles and ornaments.

All in all not bad I think. What do you think? Thanks for stopping by!

These are the parties I have linked up to this week. Please take a moment to stop by and see all of the beautiful things!



Monday, December 13, 2010

Smoke and Mirrors...

So - I mentioned what the blog is about in my last post (which you can read here) and today I thought I would show you about the way that I have decorated my tiny little shack for Christmas. I am not done yet (I don't think) but I am not really planning on doing much in the way of Christmas decorating this year. My sister-in-law is getting married on New Year's Eve (yay), and we are having a huge birthday party for my Hubs and his dad (who turn 30 and 60 respectively) next Saturday, so Christmas is just taking a back seat this year. That's fine with me as we don't have any children yet and we are spending money redoing the house so we don't need to spend any money on presents...total load off my mind.
Before I show you pics - I should mention that my dear Hubby is in the construction field and a carpenter by trade. Which means - you guessed it - NOTHING is finished in my house. We have almost no trim in the living room (with the exception of two living room windows) and no trim or baseboards upstairs in our bedroom. C'est La Vie! It's just the way it goes.
So - because I am not really feeling Christmas this year, I didn't feel like dragging the decorations out of the basement. We decided not to do a real tree or replace our old faux tree, so I decided to get a little table top tree in a pretty urn. I can always use it outside for the rest of the year and next Christmas.
Here she is:

Isn't that pretty?!
You will notice that the Angel topper is WAY too big for that dinky little tree, but it was on sale and I am sure we will have a bigger tree to use it on next year. I spent 5 dollars (5 dollars!!) on the ornaments and bell garland from the Dollartree. (I already mentioned this in my first post but - sorry for the crappy quality - you can't hardly see the ornaments or garland...trust me they are there). I also bought a cheesy sparkly drapey (very technical) thing and 3 faux giftboxes at the Dollartree and...that's the tree this year!
BUT - because I am planning on showing you ALL the nitty gritty details of these projects. This is what the back of the tree looks like -


As you can see - there is only 1 ornament on the back of the tree, and the garland does not go all the way around. That's how WE roll. I really just didn't want to spend anymore money so I  am only worried about the view when you walk in (it looks so much better in person than in the photo from my stupid camera). I feel that if anyone has a real problem with the back of my tree, they can just leave. That's all there is to it.

***SIDE NOTE: You will also notice a random jar of dirt sitting there on the top of the wall...that's from another project - Thanksgiving centerpieces. I REALLY wish I would have taken pictures of that projects. It was another one that took forever and 2 tries to get right. But I was happy in the end.***

I mentioned in the last post that I haven't quite got the hang of the glue gun yet. Lets look at an illustration of this point. Shall we? (oh yes let's)


I started by buying a wreath at our church for $10. Not a bad investment I thought. It was just plain greenery. I needed more bling. I had left over faux crystals from my wedding a year and a half ago, so I stuck those in randomly (or what I thought was randomly until I took a step back and realized that I had actually made them in a circle pattern - oh well, whatevs!). Then I had a thought!! For some reason the hubs decided to buy a HUGE bag of Cinnamon scented pine cones before thanksgiving (why? I don't know). I have been trying to use these bad boys up. I had a few left and thought they would look good added to the wreath. So I took out the handy, dandy, glue gun. I am really NOT good at that thing - YET (I will get the hang of it - I am determined).
Lets look at what I mean -


See those stringy-spiderwebby looking things? YEP...that's glue. I cannot for the the LIFE of me figure out how to stop the glue from doing that. If anyone has any tips, please share. I actually wound up having to glue the pine cones on twice because when I saw the glue strings at first I was pulling them off - which pulled off the pine cones...arrrgghhh. So I did it again and just left the strings there. I guess this wreath is what you would call a Monet. Looks pretty from far away but up close its just a big 'ol mess! (Quick - 5 points for naming the movie!)

So that's the story mornin' glory. It's all just about what you see and what you don't. I have a few more projects waiting in the wings to show you. I also get my new Silhouette SD craft cutter tomorrow and I am sure there will be TONS of trial and error to show you. I am hoping to use it for wedding crafts as well as Christmas crafts. We will see...Thanks for stopping by!


I have decided to Link this post up to the Dare to Decorate challenge going on over at Newlywoodwards

Dare to DIY

Friday, December 10, 2010

And it begins...

I was discussing with a friend over email (because really - who has physical contact with friends anymore?) my latest trial and error (mostly error) on a DIY home decor project. She said to me "You should start a blog". My response was "Really? Does the world really need another one of those?". But, alas, here I am in Blogsville. One of the many new kids on the block (oh, oh, oh, oh, oh - the right stuff!!). I have decided to start this blog on a whim on a less than busy, frigid, New England Friday. So there really is no content to speak of right now...but there are projects in the wings (actually on my porch) just waiting to make a debut. I also have not thought about the picture process for these things. I have not been able to find my camera for I don't know how long, so my picture taking will be left to my crappy 1st Generation (yes they still exist) Iphone. So I apologize for the less than stellar photo quality beforehand. Unless "Santa" hubby brings me a new camera for Christmas (because we both KNOW I have been good this year), I am not sure when I am going to be getting better quality pics. Please bear with me, and if you have been so kind enough as to actually find this blog and read this far, here is the latest project that supposedly a 4 year old could do (albeit a 4 year old who knows how to wield a glue gun), but which took me 3 trips to the dollar store, and 2 trys to complete...the "YOU HAVE SEEN IT EVERYWHERE" Ornament Wreath! ENJOY!!


Falling Christmas Object Gadget